My ‘Green’ Thumb

I do not have much luck with plants. This year I planted a lot of pots around our new pool. Many plants were to help keep the bugs away, like lemon grass and rosemary, but I threw in some flowers as well. I am pretty proud of the flower pots around the pool, I water them often as I am outside swimming and think about it. My plants out front, well they are not as cared for! I have a succulent in front of my garage, and that is doing great! I planted flowers in the large planter on my porch, but they died within weeks. The water and sun do not hit them right due to the small roof above the porch. I thought about researching good hardy plants for there, but honestly, I am not a gardener. I do not enjoy shopping for, planting or maintaining plants. I love the look, but that is as far as it goes!

I decided it was time to try fake flowers. Due to my many failed attempts at planting in the pot, it was filled with dirt which would make it easy to put in and place the stems. I was near a Hobby Lobby yesterday so I popped in and lucky me, floral was 50% off! As I walked the isles, I realized I needed 3 basic types of stems;

Tall Center Stem

Flowing Ground Cover

Spark of Color/Flower to connect the two heights.

It took a while to look around and find colors that coordinated – there many shades of green! Once I finally had the perfect combination, I headed to the checkout. I was shocked when the price came to only $32, I would have spent that on a real plant that would die in a week.

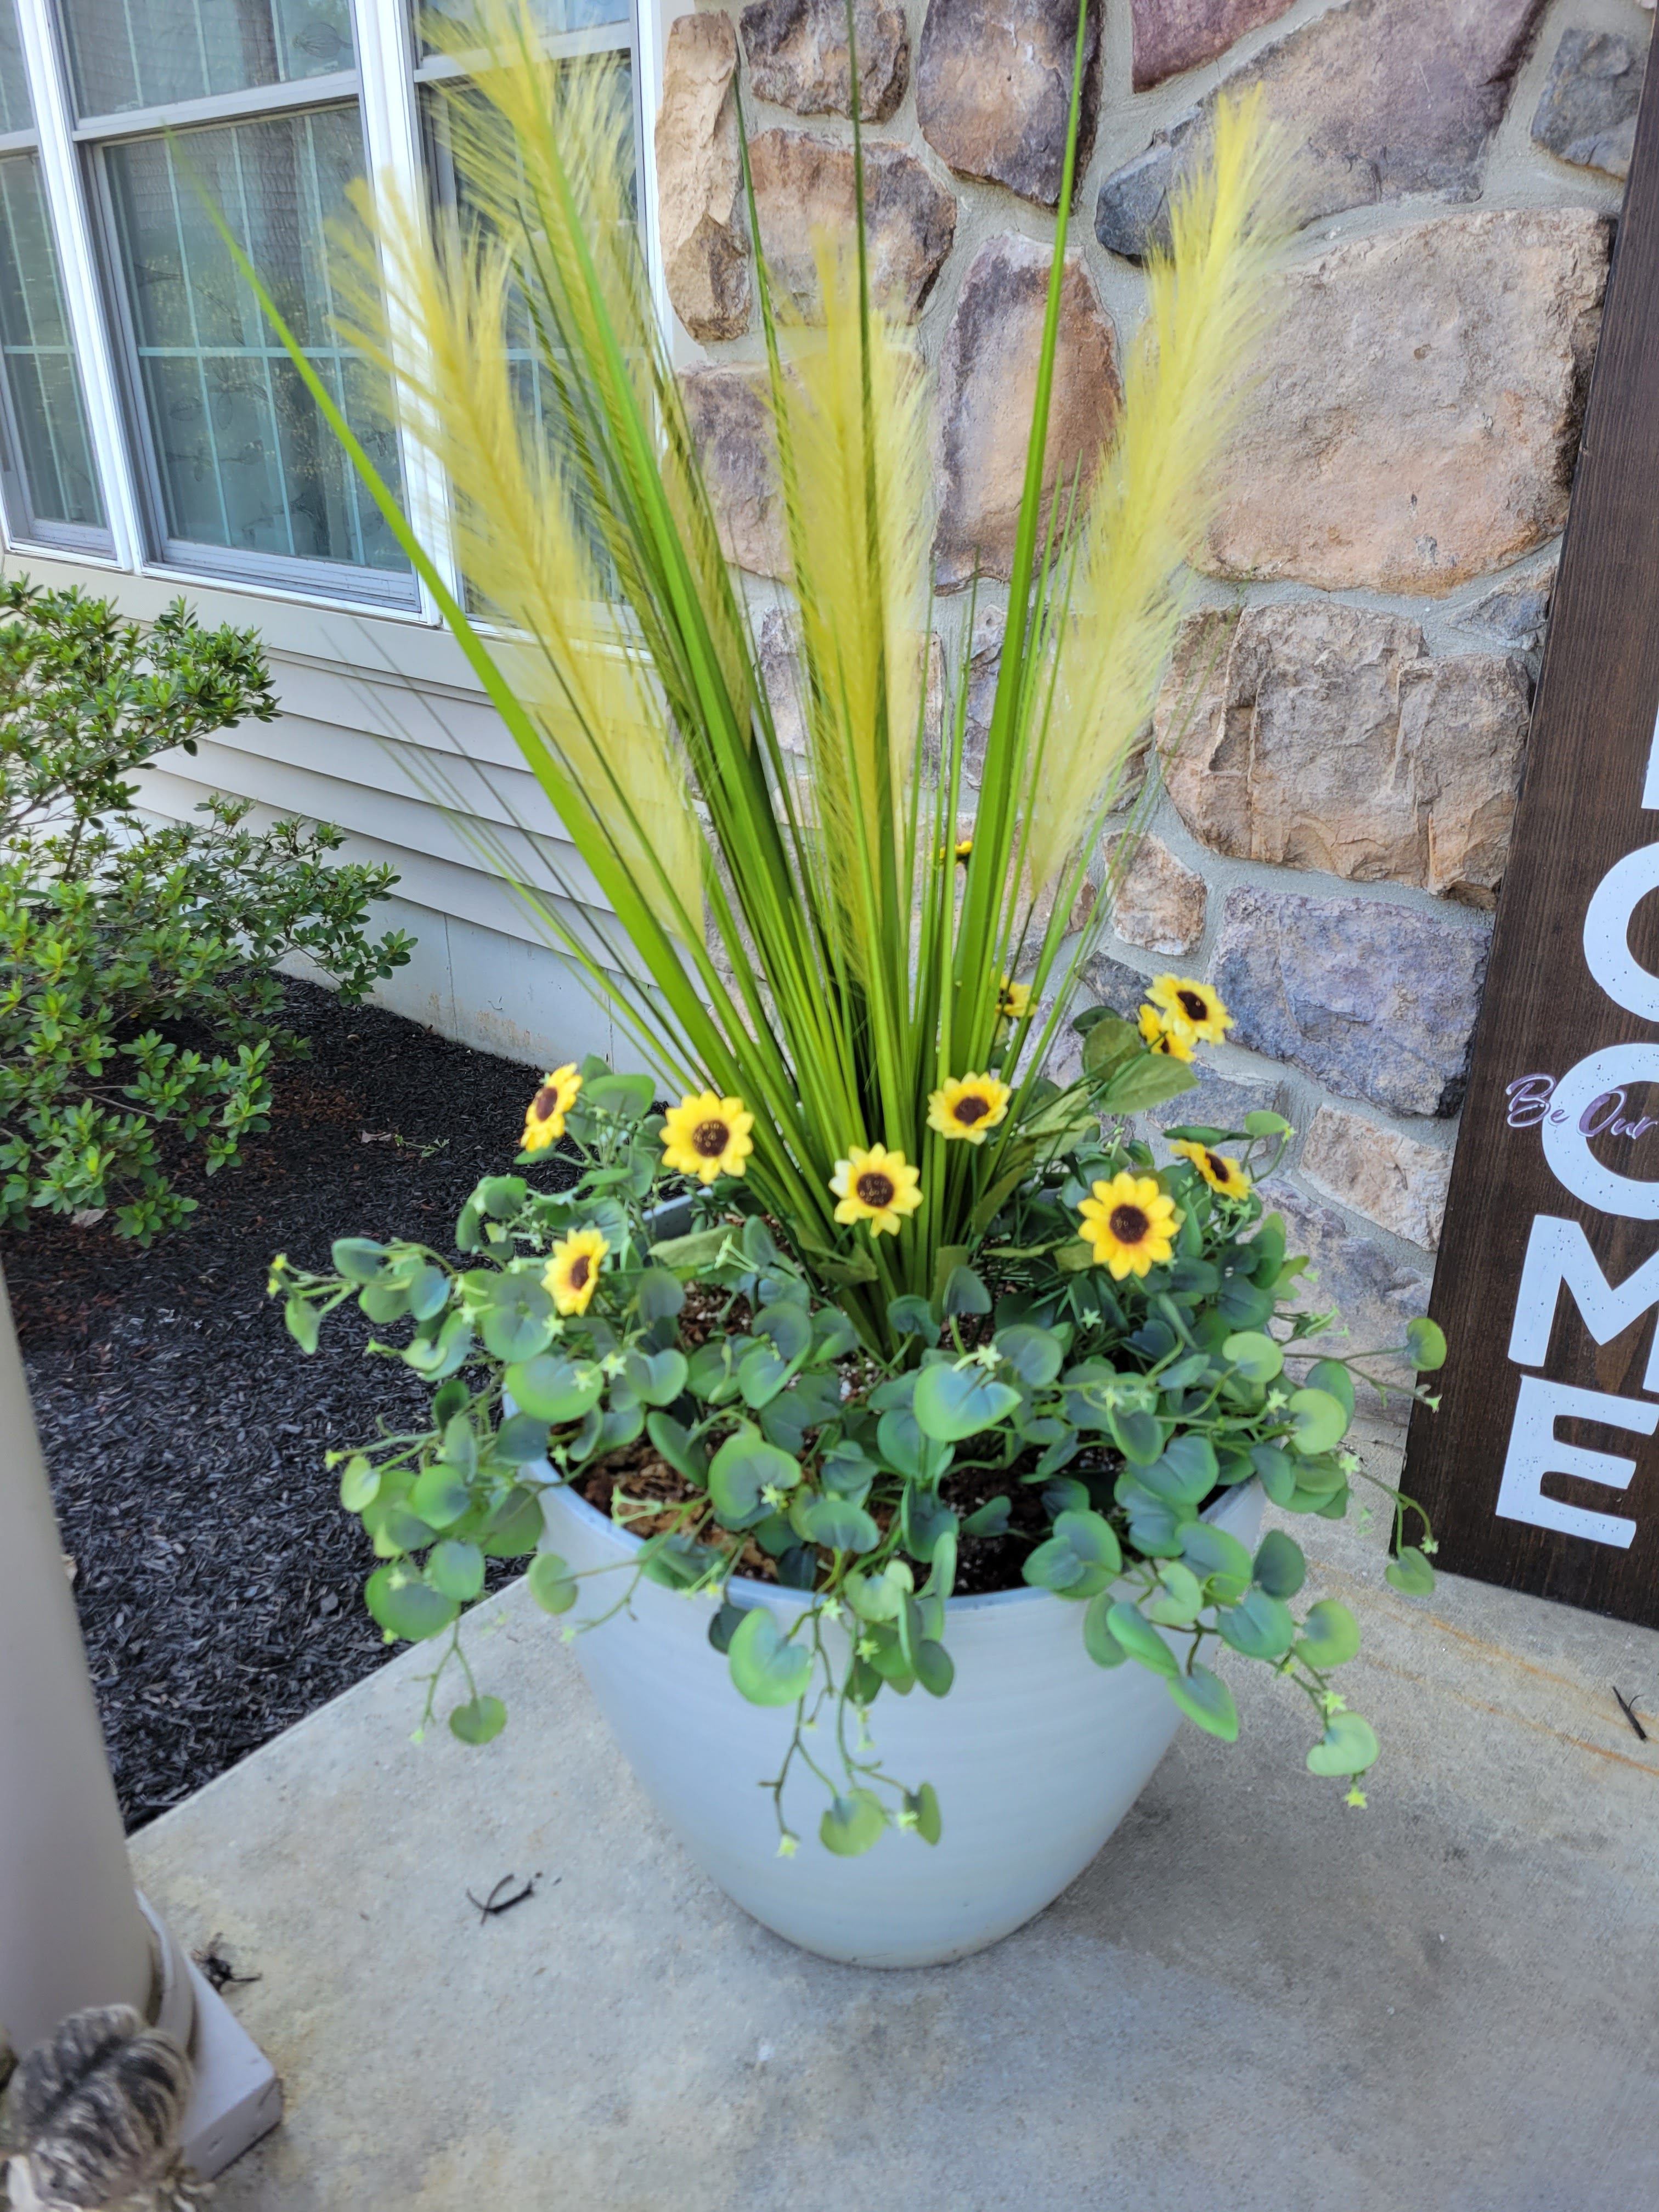
Now I was ready to ‘plant’. I started with the tall stem and fluffed the stem out and placed it in the middle of the pot, well a little off center to help the realistic look. Next I fluffed the ground cover stems. I got 3 stems and it worked well, but the stems come in different sizes so be sure to get enough to go around the pot. Next I fluffed and placed the sunflowers. I also got 3 stems and it looks good, but feel I could have got 4. I placed the barer side away from the door and walkway.

I love how it turned out!

Dining Room Reboot

My dining room project started as any good remodel – I watched a design show! I saw them apply wallpaper to the ceiling and thought it was so interesting and unique and had to try it. My dining room was pretty plain and needed an update anyway.

Before and After

I started with finding a wallpaper I liked – that was the hardest step! Honestly, there are so many choices and it is not easy to look at them in person. I stumbled across this one and had to have it! I found it on Etsy and it seemed expensive so I started to look around and try to find something like it. Unfortunately, I found nothing that measured up to this, and as my husband said, it is an investment that will last for years so get what you want!

While waiting for the wall paper to arrive, I filled all the holes in the wall and painted all the trim white. Once the wallpaper arrived, I choose paint colors for the walls, tapped off the trim, and we began painting.

Finally, it is time for the wallpaper! I measured and cut the panels for each rectangle on the lower wall. This was peel and stick wallpaper and was very forgiving as I lined it up and installed it. For the walls, it went on without an issue and went surprisingly fast.

The ceiling was a bit trickier to install and took all 3 of us. Because the wallpaper was so forgiving, it made it easy to correct as we went. We used a ladder to hold the end of the wall paper panel and my son held on to it to make sure it did not slip off. I held a drywall T up to hold the middle of the panel close to the ceiling, and my husband handled the beginning of the panel, lined it up and applied it to the ceiling.

The ceiling trim seemed to vary a bit and we found it easiest to trim once installed. This allowed us to trim right up to, and sometimes a bit under, the trim.

It is important to plan out how you will install the wallpaper to make best use of the size of the panels. You will need to line up any patterns as well.

Once the walls and ceiling were finished, I kind of just lived in the space and started to plan out what I wanted to go on the walls and in the room. I had dark wood furniture to start, but then switched my tables around and I liked the white wood table much better. I found a sideboard online, added a comfy chair in the corner and used the wall hangings I had. After all that, I had a large blank wall, 2 small wall hangings and an empty corner. I found a beverage cart to balance out the chair in the corner but was still stuck on what to do on the large wall. Then I found MixTiles! I didn’t want to have the colors of the pictures fight with the pattern and colors already in the room, so I changed them all to black and white. The tiles are easily re-positional and light weight. I mixed in my 2 smaller wall art pieces and I love how it turned out.

Vertical Toy Organization

This was our 2020 project. While stuck at home, we tackled this idea I had. My son has a wild imagination and loves to play with dramatic play items and Playmobile. Both these types of toys take up a lot of room. I think it is important to make the playroom a place that is organized. Toys should be seen and easily accessed by the child, therefore I have always tried to limit the toys. As he has gotten older, he has a large collection of dress up/dramatic play items. From knights to Star Wars, he loves to dress up and play. I decided to try using a peg board to put some costumes on the wall. It worked so well that I designed an entire wall!

First, I measured the wall and came up with a plan. I wanted to make each area separated, so I used different colored peg boards. I used Wall Control panels, they have great colors with matching metal hooks. I wanted the boards to span the whole wall in an intentional way so I spaced each panel 9″ apart. I turned the middle two panels sideways in a ‘Z’ to break it up a bit.

I decided to paint the wall a light grey and then use the same color of the panel to create stripes on the wall. Not everyone saw my vision, but I went for it!

My sketching is not perfect or even completely accurate, but it helped me to visualize the wall better. Now it was time to start.

First we painted the wall grey. Once we had enough coats and it was all dry, we moved onto the next step.

We measured and hung all the peg boards. This went easier with a laser level like this. It helped ensure that the peg boards were level the whole way across the wall.

We hung the boards before painting the stripes to ensure the stripes were placed exactly how we wanted.

From there, we marked the wall at the top and bottom of the panel where we wanted the stripe to be, and took down the panel.

Then we used the laser level to create a vertical line as a guide to place the tape.

Once all coats were done, and tape removed, we paced the boards back up on the wall.

Finding the right hooks for each item was a little challenging. I ended up ordering a varied pack and then testing the different types. Once I knew what I wanted, I ordered the other colors.

I love how it turned out! The best part is that my son is so good at putting things back on the wall!

DIY! Side Light Privacy Update for Under $10.00

What is a side light?

I had no idea, but found out those windows located on the side(s) of your door, are called side lights – Who knew?

Since I moved into my house 7 years ago, I have wanted to make my front door side lights more private. I felt like everyone could see into my house as I walked down the stairs with bed head or walked across the hallway in the middle of the night to check on my son. I know my life is just not that exciting, and no one was actually spying on us through our side lights, but they made me feel vulnerable and exposed! I loved the light coming in though, So I knew I had to find a way to keep it.

Before Picture

I forgot to take a before picture, so I had to dig through old photos to find this one. It is blurry, but you can see how open it was with the clear glass.

I started looking into ways to make it more private. They sell small curtains and blinds, but they really didn’t fit my style, or budget, and they blocked the light coming in. Then I stumbled across this frosted vinyl that could be used in my silhouette cutting machine. I bought it with the intention of creating a pattern, cutting it, and placing it on the windows. Fast forward two years to 2021, and I am finally ready to dive in!

TIP!! If you do not have a cutting machine, I did find other, already patterned styles, online that you can use. Click here for am example!

I searched the web for patterns and found one that caught my eye, then I made it my own and created it within silhouette studios. For those of you who have one, I just created a rectangle the size of each panel and used the straight line tool to create the lines. Here is what it looked like in the studio.

It is important to make sure there are an even number of lines to create the look. Think about what part will be ‘weeded’ out and therefore be negative space that will be the clear window, and what part will remain and be frosted glass.

I designed one of the window panes, and then decided that I wanted them to vary for each window, and also connect to each other. In order to do this, I copied the design and lined 3 of them up. I then moved the ‘M’ shaped lines slightly to match the one above and below and varied the middle. I then rotated the three different panes sideways to get as many cut from one piece of vinyl as I could.

The picture to the left shows the print position of the three panels.

After a quick cut and some weeding, it was time to put it on the windows. Because what I cut was not a solid piece, the best way to line every thing up is to use transfer tape. I cut the 12 x 24 inch strip you see above, into 12 x 8 strips so each panel was separate. I then placed transfer tape on top of the design on one of the 12 x 8 strips. I can then lift off the design from the backing as one whole piece. From here, all I have to do is place it on the window pane, squeegee it on, and remove the transfer tape. Just my luck, I live in the North East and it is winter time. The vinyl is not sticking to the window! I did a quick internet search and confirmed my idea should work, so I pulled out a hair dryer and began to heat up my windows. I also heated the ‘sticky’ part of the vinyl right before applying. It worked well, though a few pieces didn’t want to initially stick, they did once I pressed them down.

Half way through you can see how much privacy is being achieved. I love the end result! It feels so much more private, but it still allows the light to shine through! It took a few years, but it turned out great!

What the %&##! I thought I had a plan!

Valentines day is coming up and I am excited! Now that I have a usable craft area and some time, I wanted to make a homemade, creative and fun set of cards for my son to hand out to his classmates, like I did when he was a toddler.

Mid January, I have plenty of time and I have a plan. I have the design created and ready to go in my silhouette software, I have plenty of red pattern paper and ribbon to use, Amazon already delivered the twisty puzzle toys to go with it, and it’s easy print and cut, so I am good to go. I will complete it closer to the due date……..

The week it is due –

Monday – It’s a snow day, let’s just play outside today! It was cold, let me make homemade chicken soup, I’ll get the cards done tomorrow.

Tuesday – Another snow day! I’m so tired playing in the snow, and shoveling it the past two days, let’s watch a movie and cuddle. I will do the cards while he’s in school tomorrow.

Wednesday – He’s back in school! I can have the day to myself. Watch some DIY – ‘One of a Kind’ wait, she put wallpaper on the ceiling? It looks amazing! And yes, I should do that to my dinning room. Let’s look at wallpaper online. Baseball lessons tonight, I will work on the cards tomorrow.

Thursday (DUE TO SCHOOL TOMORROW)

9:00 am – I need to finish looking for wallpaper so I can get that ordered. It shouldn’t take long……(Do you know how many wallpaper patterns are out there? and yet none matched the one she used in the show!)

4:45 pm – What! It is time for Ninja Class, when did you get home from school? I didn’t even see you walk in….go, go, go!

6:30 pm – Now that we are home, we have to get those cards made, they are due tomorrow. It will not take long, come help me …………………….

Well, it took forever! My husband made dinner, son went to bed, and I was still working on them. I didn’t think about the paper size I was using was not printer sized paper and therefore I could not do that. Then I thought I could just cut the words – nope too small and was taking forever to weed out all the letters. I will just use the pen feature. The pens I had that fit in the machine were out of ink, and I couldn’t find the pen holder for my other pens. What am I going to do?! Grab a sharpie and a hot glue gun!

MOVE OVER DUCT TAPE – GLUE GUNS FIX EVERYTHING TOO!

How I Began to Reboot and Decide What Was Going On My New Drive

Having that realization, knowing I needed to reboot and get rid of some things, was energizing. I felt I had a purpose and a way to honor my mother. I just got to get through this reboot, then I will be feeling great! Turns out, the reboot was a much larger project then I anticipated. Where do I start? How do I accomplish this reboot?

That is when I started to make a few lists; What do I not like about myself? What do I miss about myself? What do I wish I could add to who I am? It was important to be realistic, yet not set myself up to fail as I made my lists. I had to be partial, and look at myself from a far. Most importantly, I had to take my time and complete this over several days or even weeks.

A Look at Part of My List –

What I want to get rid of –

Short temper

Eating from 9 pm – Midnight

Thinking actions of others are because of me

Jealousy

Watching TV until the morning

What I miss of myself –

Playing with my son

Crafting

Being Happy for others’ Wins

Being Social with my friends and family

Dancing in the Kitchen

What I want to add –

Hugging people

Self Confidence

Listening without comparing

Remembering the little – and big – things

Self-care

Now that I had my list, I really felt overwhelmed. How am I going to change all of this? Luckily, just as fast as I asked myself that question, I started making goals. My goals were set around the lists above and would, in theory, help me transition the bad out and the good in. This seems like it will work well for certain areas like snacking past 9, enacting a bed time on weekdays, scheduling an intentional activity with my son 3 times per week, playing music while I make dinner and making notes on the calendar to check in with friends and family on certain days while making sure to make note of any little or big things coming up for them.

The next challenge, because it isn’t something I can just set a goal for, are the characteristics that are more emotional; jealousy, being happy for others, self confidence, and my temper. These I will have to just be aware of. As I write this, I have a possible solution, I think maybe at the end of the day I can reflect on my emotions and how I handled myself that day. Since my mom passed away, I pray before I go to sleep every night. During my prayer, I also talk to my mom and tell her about my day. This would be a good time to reflect on how I handled my emotions that day.

Well, now it is all set up. It is written down. I made my goals, now I just have to implement……….deep breath in……….deep breath out………

An Opportunity I Cannot Let Slip By

Over the past two years, my job had become mundane, and even through the pandemic, it seemed to present the same challenges over and over. I knew, when I accepted the director job 12 years ago, that I would not retire there. I knew that I would give all I had, and at some point, the job would no longer be best for me. I started to become pessimistic with my staff, and even the families, the positive joy I used to get from my job, was slipping away. My time in childcare was coming to an end and I needed to look at options. In conjunction, my boss, the executive director of the company, retired in 2020. Our company was all about community and people with him in charge, and the new guy they brought in was more about money and secrecy. To be honest, if the administration did not change, I was already setting up a way to balance my work and life better so I could stay in my position longer.

Looking at my options back in 2019, I felt I could make a lateral move, with salary, into supervising in different fields or getting a job with in the state government. My job gave me experience in so many areas and I am fortunate to have that. I was able to attain a Bachelor in Science in Early Childhood Education, so I could go and become a teacher or work in the schools as well. Not everyone has the ability to build in support at their current job, or leave their current job, but I was fortunate to have the ability to do both. I already feel blessed with these options.

Then my mom passes away. Grief has never been more real. I have never felt such a hole, such a sadness. It is unexplainable. It is hard to feel yourself or be your best. At any moment, you are reminded of the loss and lose your self in grief, but for a moment or hours. There is no control, no way to hide it. You loose sleep, you doubt yourself, you feel hopeless. How do I try to balance this with starting a new career? I can’t leave my stable job, when the rest of me feels so unstable.

With the new director I was even more miserable, and in a toxic environment. Work was hard, my grief showed up wherever and whenever it wanted to, and I was exhausted. Having an only child during quarantine was hard too, we were his only playmates. Stress was at an all time high then my husband, in his loving ways, decided to make some moves and found a way for me to leave my job, without rushing into another job. He worked the budget and found a way. I didn’t even ask, he just did it.

I prayed and talked about it for months. It was so scary, but I finally took the leap and gave my notice. I gave a month, they asked for me to stay for two to help the transition so I did. It was a strange two months, and when I walked out on my last day, I was still scared and praying I made the right choice. The one thing I promised myself was that I was going to make this time count. I was not going to waste it laying around. I was going to make my mama proud with how I reboot myself.

As I continue to write on this blog, I will continue to grow and learn about just who I want to be. I plan on trying new things, taking on small jobs and volunteer opportunities throughout 2021. I know I have an opportunity that doesn’t come around often, and I hope I can help others by providing ideas and tools to help reboot themselves. Now let us start the journey!

My Noise; The how and the why I chose to reboot

2020 was a year of change for most of us as the pandemic spread through the world. Although 2020 is the year I chose to reboot, my noise began to build 7 years before. My mom was diagnosed with stage 4 cancer while I was pregnant. I think the thought of not having her help me navigate parenting, caused me to begin protecting myself with noise. I kept her help at a distance so I would not learn to rely on it. Luckily, the year she was diagnosed I had a random thought, and with encouragement from a good friend, I acted on it and my mom was soon building in-law quarters onto our house. Even though I was struggling with noise and pushing her out at times, she was always right there. I had 7 great years, with her healthy for most of those years.

While adjusting to the thought of loosing , my mom and also living with her, my job started to overtake my time. It was easy to justify as by this time, my son was in preschool and was old enough to come with me to work. By the time he was in Kindergarten, I was intrenched in my work. We lived outside the school district of my centers so my son was no longer able to come to my centers, which started affecting my time with him.

When I was home with him, and even when we were on vacation, I was stressed and overwhelmed. I just kept telling myself, after ‘insert crazy incident here’, work will not take so much of me. Well, those inserts just kept coming and work never seemed to slow down.

I just kept turning up the noise, and hoping to get through without a meltdown. Then I lost my mama, my biggest fan, my largest supporter. Before losing her, I would say that my husband and her were tied for those last two, but since I have lost her, I realize it was never even close. She was my mom, and really my dad too most of time. She was a warrior and a giver until the end. She will always be who I aspire to be like.

Losing my mom brought my world down fast. I was in Florida for vacation when I got the call to come home to Pennsylvania. We drove straight through the night and I was able to be there with her while she was still able to hold my hand. The peaceful passing was everything she had prayed for, with family all around her, at home in her own bed. That is how 2020 started for me.

This image has an empty alt attribute; its file name is obi_8196groove-1.jpg

By February I learned my dad had stage 3 lung cancer. In March, the world was shut down by COVID. In April my dog passed away in his sleep. We opened our doors at work again the first week of May so my job became more demanding and difficult as we brainstormed and found a way to finance and reopen for our families in need. In June, new restrictions and building issues caused a revamp of our summer program, which cared for over 100 kids still. So more barriers and protective gear, new room arrangements, and supplies needed…..and that was just my headlines for the first 6 months of 2020.

All of this with each holiday and birthday met with isolation, and everyday I was trapped in my house, I was reminded by the empty chair, the empty in-law quarters, that my mom was gone. Grieving in isolation was really hard.

This image has an empty alt attribute; its file name is img_20190928_165315_2.jpg

One thing I pulled from 2020 was that my mom was amazing, strong, kind, giving, and would do anything for her girls. Then one morning, while crying in bed, I decided that I wanted to be more like her, or at least make her proud. That is when I decided it was time to REBOOT. Look at myself honestly and take the time to be intentional about myself, and my actions, while finding ways to enrich the lives of those around me.

This image has an empty alt attribute; its file name is img_20200118_221136.jpg